A “60-inch” linear electric fireplace does not automatically give you a 60-inch appliance, flame view, framed opening or finished wall feature. That number may identify a model in a product family, but the manufacturer’s drawing—not the name—defines what will occupy the room.
Choose in two passes. First, compose the visible band on the real wall. Then test one exact model against its approved installation method, depth, heat and air paths, power, and service access. The first pass creates a candidate; the second decides whether it belongs on the shortlist.
The number in the product name is not the finished fireplace
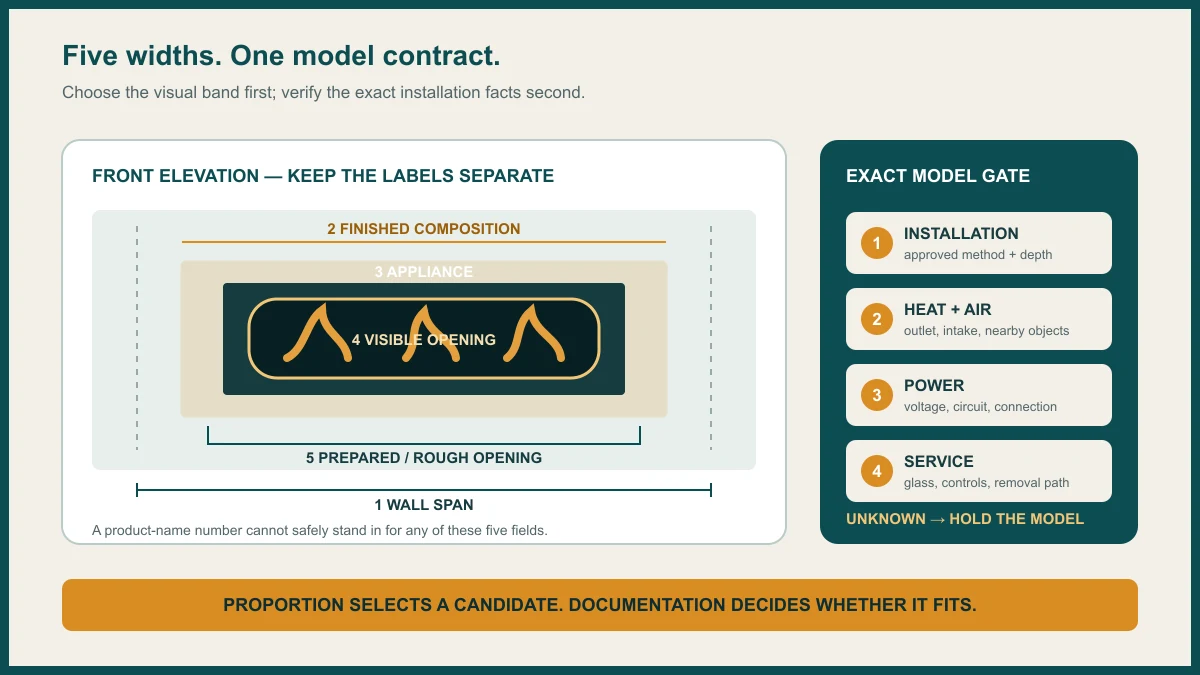
Linear-fireplace shopping becomes much easier when five widths stop sharing one label:
- Usable wall span: the width between real interruptions such as returns, doors, windows, cabinetry and changes in finish.
- Finished composition: the fireplace plus panels, tile, trim, a surround or deliberate side space that will read as one feature.
- Overall appliance: the exact outer width of the unit, including the body or frame identified in the manufacturer drawing.
- Visible opening: the part through which the flame and media are actually seen. Record its height as well as width.
- Prepared or rough opening: the framed cavity required for the exact approved installation path.
These fields can be close without being interchangeable. The official Dimplex Ignite Evolve 60 specification, for example, lists that named appliance at 61 1/4 inches wide and its framing width at 60 5/8 inches. Those figures belong to that model and document. Neither tells you, by itself, how wide the finished feature should be or how another “60-inch” unit is built.
| Field | Copy or measure | Do not substitute | Decision it controls |
|---|---|---|---|
| Usable wall span | Measure between actual wall interruptions | Total room width or a real-estate plan | Whether the proposed composition has room to breathe |
| Finished composition | Draw the complete intended panel, trim, surround and side space | Fireplace width alone | What the eye reads as the feature |
| Overall appliance | Use the exact model’s dimension drawing | Nominal product-name size | Physical fit and finish relationship |
| Visible opening | Record viewing width and height under the manufacturer’s labels | Outer glass or bezel dimensions | Whether the fire reads as a narrow ribbon or a stronger focal point |
| Prepared opening | Use the current manual for the approved path; include width, height and depth | Appliance size or an opening from another model | Whether the wall can accept the intended recess |
Give every candidate its own row and keep the manufacturer’s terms. If a drawing does not answer one field, write UNKNOWN. Copying the nominal size into an empty column creates confidence without evidence.
Build a proportion band instead of trusting one ratio
A fireplace-to-wall percentage can be a sketching prompt, but it is a poor purchase gate. The same ratio produces different rooms when one wall has a doorway, another shares space with a television, and a third uses a wide panel that visually joins the fireplace to cabinetry.
Start with the usable span, not the longest uninterrupted dimension you can find. Mark wall returns, doors and their swings, windows, switches, receptacles, vents, cabinetry, furniture and the path people take through the room. Then draw the finished composition inside that span. A fireplace centered inside a panel is not the same composition as the same appliance floating on paint.
Make at least two versions at the same scale. Painter’s tape works on a bare wall; a scaled elevation works when finishes or a TV are still being planned. For each version, draw both the complete appliance and the visible opening. View the mockup from the main seat, the room entrance and any strong side angle.
Three observations are more useful than a borrowed percentage:
- Visual pressure: does the finished band crowd an opening, corner, television or cabinet even though its measured rectangle fits?
- Unclaimed side space: does the remaining wall read as deliberate space, or as two awkward leftovers?
- Room hierarchy: should the fireplace lead the wall, support another object, or stay quiet? The answer changes the useful size range.
If neither version works, change the composition before changing specifications. A technically smaller fireplace may look better when the finish is wider; a wider viewing opening may need less surrounding visual weight. This is a design comparison, not permission to ignore the exact unit’s installation requirements.
Viewing height decides whether the fire is a ribbon or a focal point
Width dominates product names, but viewing height determines the shape of the fire. A long, shallow opening reads as a horizontal ribbon. A taller opening gives flames and media more vertical presence, even when the appliance is not dramatically wider.
Compare the visible rectangle, not a cropped lifestyle photo. The current Modern Flames Landscape Pro Slim family page lists nominal 44-, 56-, 68-, 80- and 96-inch models with a 15-inch viewing height. That is useful family-bound evidence: moving across those sizes extends a viewing band with a common published height. It is not evidence that every 68-inch linear fireplace has the same proportions.
Put visible width and height beside the outer-appliance dimensions in your ledger. If the manufacturer publishes a viewing area, use that label exactly. If it shows only glass size, do not quietly rename it “flame area.” The distinction matters when a broad frame, side trim or dark glass changes how large the active fire looks.
Dimensions also cannot prove flame realism, daytime visibility, reflection, sound or the quality of motion. Those are product-performance questions. Without reliable testing, use manufacturer documentation to establish available modes and controls, then treat subjective appearance as unresolved until you can see trustworthy model-specific evidence.
The installation path can overturn the visual winner
Once a band looks right, open the current manual for that exact model. Confirm that the intended method—surface hanging, partial recess or full recess—is actually permitted. Then copy the complete appliance depth and every prepared-opening dimension for that path.
This is where the front elevation meets the wall section. A surface installation adds projection to the room. A full recess commits framing depth and finish details. A partial recess can leave a deliberate or unwanted edge depending on the unit and surround. The attractive front view cannot decide among them.
If the installation path is still open, use the recessed versus wall-mounted fireplace guide to compare the project consequences without mixing widths from different models. If you are specifically considering a surface-mounted option, the wall-mounted fireplace fit guide tests support, projection, power and removal against the finished wall.
Manufacturer families can support more than one path, but the language remains model-bound. Napoleon’s current Entice 50 page, for example, publishes separate overall, viewing-area and framing fields and describes wall-hanging as well as full or partial recess options for that named unit. Those options demonstrate why the fields belong in one record; they do not authorize the same methods for a different product.
Heat, power and service access belong in the size decision
A linear fireplace can fit the drawn band and still fail the project. Add four model gates beside the five widths:
- Approved installation and depth
- Record the named method, outer depth, prepared depth and every finish condition from the matching manual.
- Heat and air path
- Locate the heater outlet and intake. Copy the model’s nearby-object, floor, ceiling, mantel, combustible and electronics language rather than borrowing a gap from another fireplace.
- Power
- Record voltage, wattage or amperage, circuit language, permitted plug-in or hardwire method, cord exit and the position in which a connection must remain accessible.
- Service
- Trace how glass, media, controls and the appliance itself are accessed or removed after panels, trim, shelves and furniture are finished.
The current Landscape Pro Slim manual is a good example of why a marketing size grid is not enough: the manual carries the named family’s installation and electrical conditions. A product page can help create a candidate; the matching document determines whether the project assumptions are valid.
If a TV shares the wall, proportion is only one layer. Viewing height, heat direction, exact clearances, power and service access must agree as one arrangement. Move that candidate into the electric fireplace and TV wall planning guide before freezing either object.
Do not add invented “extra clearance” to make an unknown feel safe. An arbitrary allowance can still violate the real instruction and may distort the composition. Keep the model on hold until the controlling document or qualified site-specific authority answers the field.
Treat visual effects as tradeoffs, not proof of fit
Once the fixed geometry and model gates pass, feature comparison becomes useful. Separate what changes the project from what changes preference.
- Project-changing features: heater location, voltage and connection method, approved installation paths, depth, control access and replaceable or serviceable parts.
- Preference features: flame and ember colors, media choices, downlighting, brightness steps, timers, remote or app controls and flame-only operation when documented.
A larger feature count is not automatically a better fireplace. More lighting zones can give a room more visual settings, but they do not correct an undersized viewing band or an inaccessible service path. App control can be convenient, but it can also add an ecosystem and support dependency. Optional media may change the look while adding cost that a simpler included set avoids.
Make the preference tradeoff concrete. Write the two or three modes you expect to use, whether the heater will commonly be off, which controls must work without an account or phone, and whether optional media is part of the planned price. Leave perceived realism and sound unranked unless reliable model-specific testing supports the comparison.
Freeze one candidate with a model record
Put the chosen model number and current manual revision at the top of one record. Under them, freeze the decision in three blocks:
- Composition: usable wall span; finished composition width; appliance width; visible width and height; prepared opening width, height and depth.
- Eligibility: approved method and depth; heat outlet/intake and nearby-object conditions; electrical contract; glass, media, control and appliance service movements.
- Preference: the few visual modes and controls that matter, what is included, and which options affect the real project price.
Mark each line documented, measured or UNKNOWN. Keep room measurements and product requirements in separate columns so an installer’s site fact cannot be mistaken for a manufacturer allowance.
Return one of four outcomes:
- Shortlist: the composition works and every controlling model field is documented and compatible.
- Revise the composition: the unit may be eligible, but the visible band, height or finish relationship is wrong.
- Hold the model: a controlling manual, wall, heat, power or service fact remains unknown.
- Change model or installation path: an exact requirement conflicts with the room or intended finish.
If no linear candidate can create a useful band without hiding a physical conflict, return to the types of electric fireplaces and change format before comparing brands. The goal is not to force the longest rectangle onto the wall. It is to choose one documented fireplace whose visible proportion, installation contract and daily controls agree.